

Foreword:
Are you struggling to implement OpenCV with FFmpeg in IntelliJ? Don’t worry, you’re not alone. Setting up a computer vision application can be a daunting task, especially if you’re new to the field. Even with the help of powerful tools like ChatGPT, it can be challenging to get all the information you need to get started. But fear not, in this article, we’ll guide you through the process step-by-step, so you can set up your development environment with ease and start building your next computer vision project. And the best part? We even used ChatGPT, to write the article for us ! So, let’s dive in and start building your next computer vision project with ease.
Setup:
For this tutorial, we’ll be working on Linux (Ubuntu 22.04) and using the 2023.1 version of IntelliJ. We’ll also be using OpenCV version 4.7.0 and FFmpeg version 6.0. It’s worth noting that while these specific versions are used in this tutorial, the steps we outline here should also be applicable to other versions of the tools as well.
Last but not least, you will need to install CMAKE and GCC to work with opencv, as well as the following dependencies:
sudo apt-get install build-essential cmake git libgtk2.0-dev pkg-config libavcodec-dev libavformat-dev libswscale-dev
Installation:
Before we dive into the details of implementing computer vision applications with OpenCV and FFmpeg, we need to make sure that we have these tools installed on our system. In this section, we’ll walk through the steps to install FFmpeg and OpenCV on a Linux system.
Let’s start by installing FFmpeg using the Linux terminal. Here are the steps:
- Update your package list by running the following command:
sudo apt update && sudo apt upgrade- Install FFmpeg by running the following command:
sudo apt install ffmpeg- Verify that FFmpeg is installed correctly by running the following command:
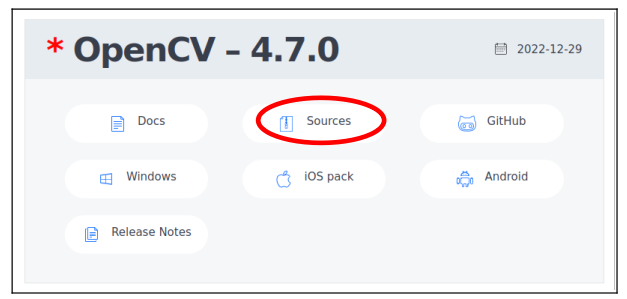
ffmpeg -versionTo download OpenCV, go to the official website of OpenCV (https://opencv.org/releases/) and select the version you want (in this case, we’ll be using version 4.7.0). Click on the “Sources” link to download the package.
After downloading OpenCV, unzip the folder and move it to your desired installation location. This can be a global location or a local directory for your project.
Next, you’ll need to add FFmpeg support to OpenCV. To do this, navigate to the folder “cmake/templates” in the OpenCV directory and locate the file “cvconfig.h.in”. Open the file and append the following line to it:
#define HAVE_FFMPEG 1Now, let’s open up a terminal and navigate to the OpenCV folder. Once there, we’ll create a “build” folder by shouting this command at our computer:
mkdir buildNext, let’s change into the build folder with this equally forceful command:
cd buildNow it’s time to get our CMake on! Let’s run the command:
cmake ..This will generate the build files with FFmpeg support:
make -j$(nproc)And that’s it! Once the build process is complete, you can install OpenCV :
sudo make installFinally, you need to configure IntelliJ IDEA to use the OpenCV library.
Open your IntelliJ IDEA project and go to File -> Project Structure.
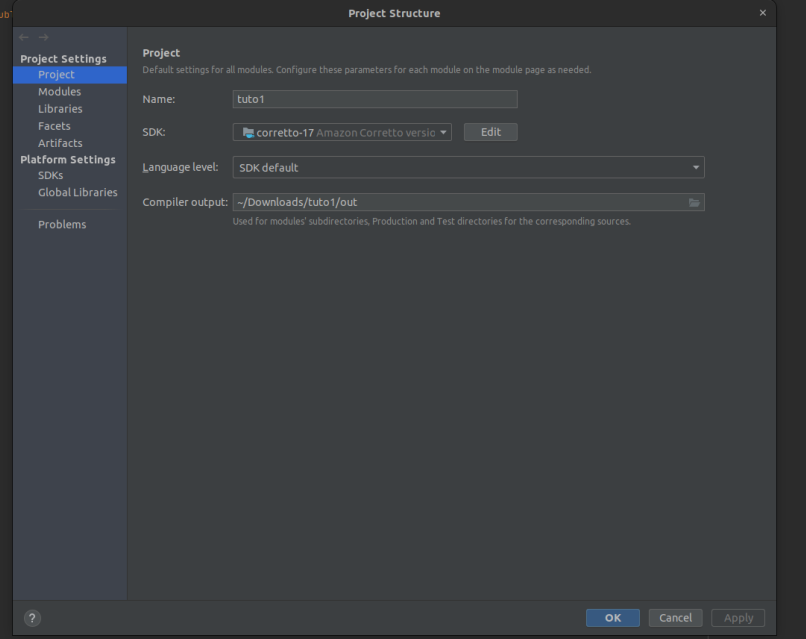
Under Project Settings, select Modules
Click the plus icon to add a new module. Navigate to the bin folder :
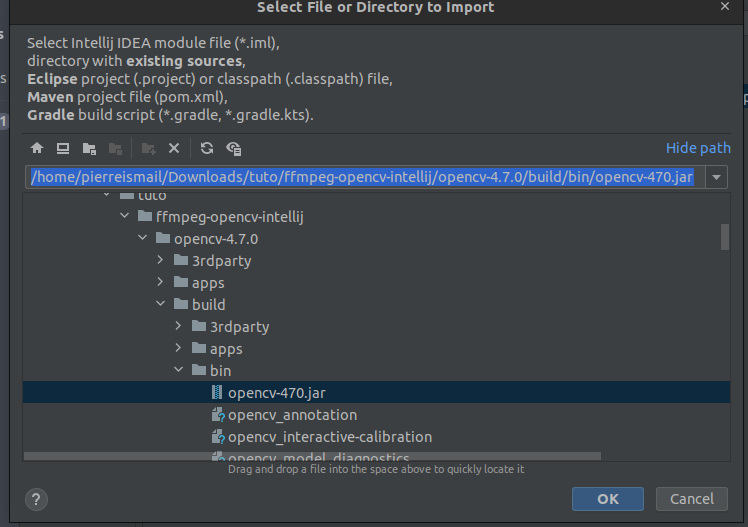
Choose “Java” as the library type and give it a name.
Under the Classpath tab, click the plus icon and navigate to the OpenCV library directory (usually /usr/local/lib).
Add the opencv-<version>.jar file to the classpath.
If added correctly, you’ll end up with this:
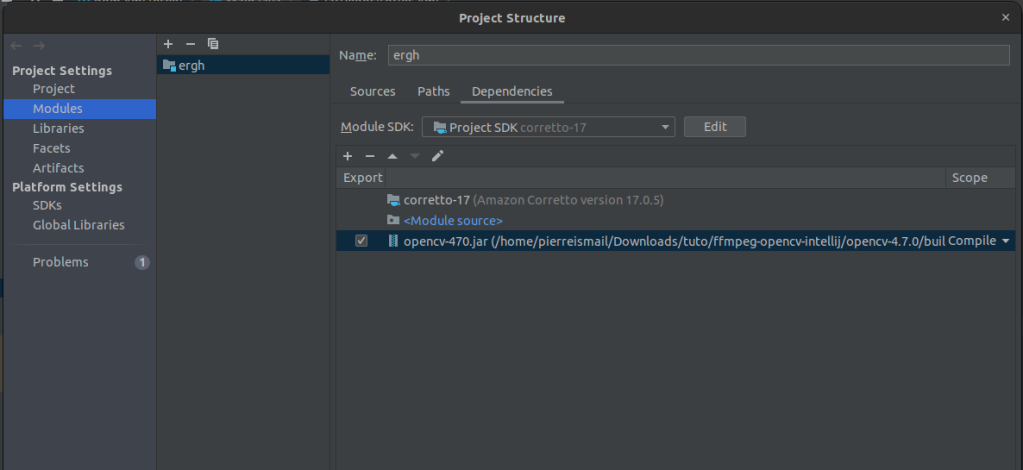
Double click on the line that was added, to open the following menu:
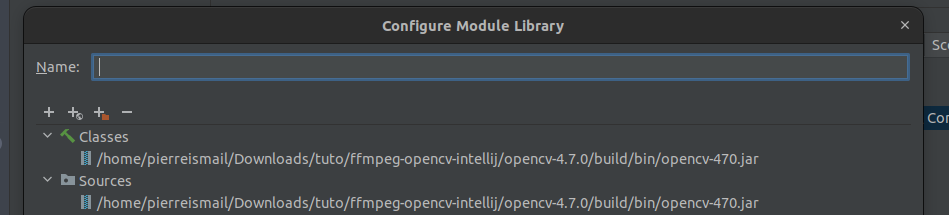
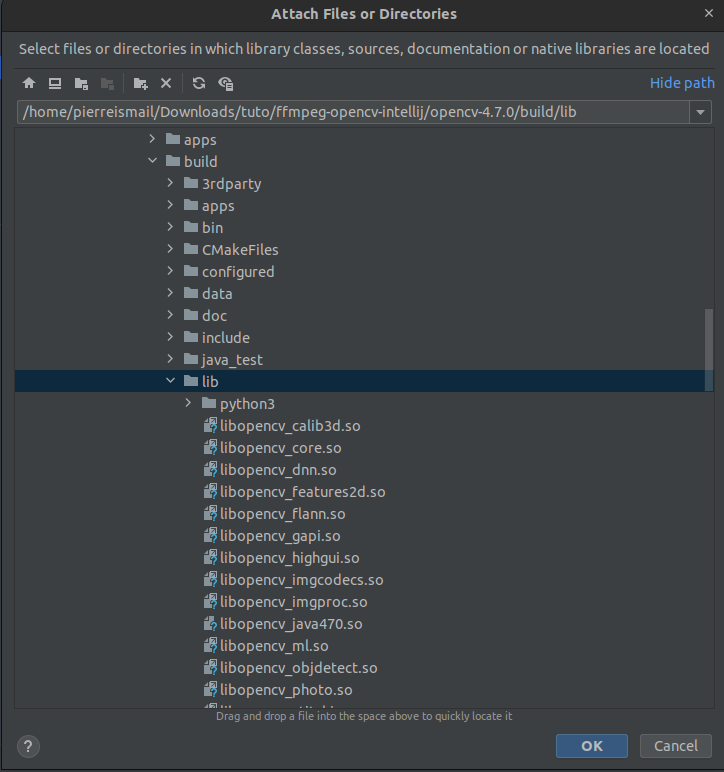
Click on the + and find the path to the native libraries (the .so files)
After this, you should be all set.
To try it out, let’s make a quick first program:
public class Main {
// Loads the library
    static{System.loadLibrary(Core.NATIVE_LIBRARY_NAME);}
    public static void main(String[] args) {
// If opencv is properly configured, there shouldn’t be any issue with creating a Mat object
        Mat u= new Mat();
// To check if FFMPEG is used as a backend, try and open a video and get the backend name
        VideoCapture di=new VideoCapture();
        di.open("/home/ld/Downloads/video.mp4");
        System.out.println(di.getBackendName());
    }
If all works, you should see FFMPEG on the screen (the backend name).
And that’s it, you’re good to go, and should now be able to use OpenCV and FFmpeg in your next java project!
If you have any questions or want to see more of our work, be sure to follow us at:
lizardanddog.com
Or anything related to AI or our Start-Up: https://www.cloco.ai

Leave a comment